Last Updated on January 22, 2026
If you don’t love crunches but you want a flatter, tighter waist, these planks for abs are for you. Planks train your core to stabilize your spine, build deep strength, and improve posture so your stomach looks more pulled in.
In today’s episode of CCtv, I break down how long to hold a plank, the form cues that matter most, and 20 plank variations you can use to level up your abs without feeling like your low back is doing all the work.
Plank Exercise Benefits
Planks are one of the best ways to train your core because they challenge the deep abs, obliques, shoulders, and glutes at the same time. When your form is dialed in, they can be a smart option for beginners through advanced exercisers, including many people who feel cranky after traditional ab workouts.
Form matters more than time. If your low back starts to sag, your hips start to pike, or you can’t breathe normally, you’ve hit your limit for that set. Reset and go again.

Now let’s get into the best plank exercises for abs for a flatter, tighter core.
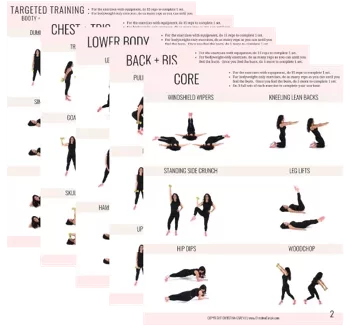
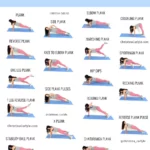
20 Planks for Abs

Pin these planks to Pinterest so you’ll have them forever.
Best Plank Exercises for Women
There are 4 basic plank poses that the rest of the exercises build upon.
Start with these planks first, to see your strength, balance, and endurance improve. As you get stronger you can move on to the more challenging plank exercises.

Basic Plank #1: Plank
When it comes to planks, form is everything. Paying close attention to form not only ensures you’ll get a great workout, but also that you’re protecting your body from injury. Start in tabletop position, kneeling on the floor with hands directly below your shoulders. Lift your knees until you are supporting your weight on just your toes and hands. Spread your fingers to make a wide, stable base. Line up your shoulders over your hands and heels over your toes. Hold your body in a straight line from the top of your head down to your heels. Hold your core in tight, being careful not to let your stomach sag or your back round out.

Basic Plank #2: Elbow Plank
Starting from standard plank position, lower yourself until you’re resting on your forearms. Keep forearms parallel to each other with hands flat on the ground or clasped together if that’s more comfortable.

Basic Plank #3: Side Plank
Starting in standard plank position, bring your legs together until your heels touch. Twist until you’re balanced on your elbow with your feet stacked on top of each other.

Basic Plank #4: Reverse Plank
Sit on the ground with your legs extended in front of you and arms at your sides. Place hands on the floor next to your hips, fingers pointing towards your feet. Lift your hips as high as you can, aiming for a straight line from chin to toes. You may discover here that your shoulders aren’t as flexible as you thought; just take it slow. And, you know, try not to cry.

Marching Plank
Take your plank on the move by adding an up-and-down motion. Assume the standard plank position on hands and toes. Slowly lower your right arm down to your forearm then bring your left arm down as well so you are now supported by your forearms. Then place your right hand on the ground and begin to push your body back up, allowing your left hand to follow. Repeat, allowing your left arm to lead. Sing “Follow the Leader” to keep your rhythm. Ignore any weird looks at the gym; they’re just jealous.

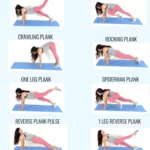
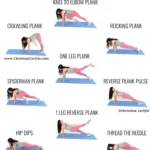
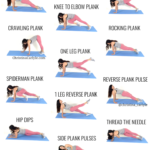
Knee-to-Elbow Plank
You know the drill: Start in a standard plank position. Slowly bring your right knee underneath and across your body, toward the inside of your left elbow. Again, just get it as close as you can without dropping your right shoulder and hip. Repeat on the other side.

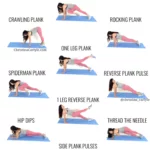
Crawling Plank
Start in a plank position and keeping your abs in tight walk your hands in towards your feet as you exhale. Quickly reverse the movement and walk your hands back to the plank position as you inhale to complete one rep.

Rocking Plank
From a basic plank, rock forward on your toes until your shoulders move past your hands. Then push your shoulders backward until your heels extend beyond your toes. Move slowly and in a controlled manner to challenge your balance, coordination, and shoulder strength. This move can be done on your hands or forearms.

One Leg Plank
Start in a standard plank position. Lift one leg up as far as you can, keeping your body flat and both the extended and supporting leg straight. Repeat on the other side.

Spiderman Plank
Start with a standard plank. Slowly bring your right knee toward the outside of your right elbow. You’ll be tempted to look back to see how close your knee is—don’t do it! It will make you round your shoulders and drop your hips. Just get it as close as you can without losing your form. Pretend like you’re Spiderman trying to climb up a building… If you can touch your knee to your elbow, you get extra credit and are excused from Friday’s final exam. Repeat on the other side.

Reverse Plank Pulse
Start by sitting on the ground with your legs extended in front of you and your arms at your sides. Plant your hands firmly on each side and lift your hips up as high as they’ll go. Lower them slowly toward the ground (without touching it) and then lift them again. To make it a bit easier, start with bent knees and work up to keeping your legs straight.

Reverse Plank Leg Lift
Start in a reverse plank with your hips lifted and head facing forward. Lift one leg as high as you can without bending your waist or knees. Repeat on the other side.

Hip Dip Plank
From the elbow plank starting position, slowly dip both hips to the right side. Go down as far as you comfortably can without touching the floor. Quickly lift back up to a plank and repeat on the left side. Quickly alternate dipping your hips from side to side to do this exercise.

Thread the Needle Plank
From a side plank, lift your top arm straight up. Bending slightly at the waist, reach down and “thread” your hand through the gap between your side and the floor. You should feel a deep side crunch. Return to your original position. When you’re done on one side repeat the same number of reps on the other side.

SIDE PLANK PULSES
From a side elbow plank position, this your start position. Lower your hips down towards the floor without putting all of your weight on the floor. Quickly reverse the movement back up to the start position to complete one rep.

Rowing Plank
Holding a medium-weight dumbbell in each hand, get into standard plank position. Make sure your weights have flat edges or you won’t be able to balance on them. Bend your right elbow and slowly lift it up toward the ceiling, keeping your elbow in tight by your side. Lower the weight and repeat on the other side.

Chaturanga Plank
From standard plank position, making sure your shoulders are directly above your hands, slowly lower yourself until your body is in line with your arms. Keep your elbows touching your ribs and your core tight so nothing touches the floor except your hands and toes. Imagine the ground is hot lava (or, you know, any other surface you wouldn’t want to come into contact with. Floor of a movie theater, anyone? Get creative—it will make the time go faster!)

X Plank
You don’t have to be one of the X-Men to do this variation (Although it wouldn’t hurt! We’ll keep your secret). Start in a standard plank. Move your legs out laterally until your feet are planted wider than hip-width apart. If this feels tough enough, you can stay in this position (a Y plank, perhaps?). You can add some extra upper-body work by walking your hands out wider than shoulder-width apart until you’re in a full X.

Stability Ball Plank
Kneel, facing away from a stability ball. Lift one leg behind you and place your shin or foot on the ball. (The ball will likely have rolled away from you at this point, as balls do. It helps at first to position the ball in front of a wall so it can’t go far when it escapes.) Lift your other leg onto the ball. Straighten out into a plank position. Use your forearms or hands, depending on the height of the ball and how well you’re able to balance.

Bird Dog Plank
Begin in a standard plank. Lift your right leg straight behind you, then lift your left arm straight in front of you. Keep your body in a straight line from fingertip to toe. You’ll soon discover that this works your core and your balance in a major way.
How to Do the Plank Exercises in a Workout
- Warm up with 3 to 5 minutes of easy movement (walk, march in place) plus a few shoulder circles and hip hinges.
- Pick 4 to 6 planks from the list below.
- Pose planks: hold each one 20 to 60 seconds with perfect form.
- Moving planks: do 10 to 15 reps per side (if applicable) to complete 1 set.
- Complete 2 to 4 rounds depending on your level.
- Quick add on option: pick 1 to 2 planks and tack them onto the end of your strength workout.
Common Plank Mistakes
- Low back sag: squeeze glutes, tuck ribs down, shorten your stance, and hold for less time.
- Hips too high: bring ribs and hips into one line, then brace like someone’s about to poke your sides.
- Shoulders cranky: stack shoulders over elbows or wrists, push the floor away, and try incline planks on a bench.
- Wrist pain: switch to forearms or do the plank on fists, or elevate hands on a sturdy surface.
Why Planks Are Better Than Crunches for Abs
Planks and crunches train your core differently. Crunches are a short range, front of the body movement. Planks are a full body stability exercise that teaches your abs to brace, protect your spine, and hold great posture.
If you’ve ever felt crunches in your neck or low back, it’s usually a sign your form has broken down or you’re using the wrong variation for your body. With planks, the goal is to keep your ribs stacked over your hips, squeeze your glutes, and breathe.
Think of your spine like something you want to protect while you train your abs. Repeated bending can be irritating for some people, especially if they already have back sensitivity. Planks let you build core strength with less motion at the spine, which is why a lot of people find them more comfortable.
That said, you can absolutely get great results with crunch variations when they’re done well. I’m plank biased because they give you core strength plus posture plus a flatter looking waist all at the same time.
Research suggests planks can strengthen the abs without the same spinal motion as crunches.
Notes About These Plank Exercises
I recommend doing a focused ab workout once a week. If you love planks, add a couple sets after a strength workout, but don’t do the exact same plank routine daily. Your body adapts fast, and rotating variations helps you keep progressing without hitting a plateau.
Abs Are Made in the Kitchen
If you already feel like you have abs but they’re hiding under a layer of stubborn fat, you’re not alone. Visible definition comes from a combination of smart training and nutrition that matches your body.
Want results faster? Take my Program Style Quiz to find the best workout plan for your goals. And if you’re working on fat loss, energy, or cravings, take the Metabolic Type Quiz because eating for your metabolic type gets faster results.
If you don’t like crunches but want a flat, toned tummy, these planks for abs are perfect for you! If you want abs I recommend plank exercises over crunches for a few reasons.
That’s why I’m excited for you to watch today’s episode of CCtv. I explain more about planks and share 20 different plank exercises you can use to train your abs, avoid back pain, and increase core strength.
Try these crunch-free plank exercises to strengthen your core and get abs, without killing your spine.
I hope you liked these planks. Leave me a comment and let me know which plank exercise you liked the most.
If you think that it could help someone you know, please share it.
It works, if you work it. So work it! You’re worth it!
xxoo
![]()
If you liked this post you’ll love these ab workouts, too
Want to get fit and healthy exercising smart, not hard?
Take my Program Style Quiz to discover the program that’s best for you and your goals. My programs get results significantly faster that my free content.


Metabolic Type Meal Plan Results
Eating Healthy But Not Seeing Results?
The solution is eating for your unique metabolic type - When you eat foods that match your Metabolic Type you can lose weight and feel great 3 times faster. Take the Metabolic Type Quiz to discover your type and the meal plan that's best for you.
TAKE THE QUIZDon’t forget to pin these planks to pinterest so you’ll have them forever

Dr. Christina Carlyle is a Doctor of Functional Medicine, FDN-P, Nutritionist, & Trainer who transformed her body and health – getting off 7 medications and losing 40 pounds for good. Now, she helps other women get happy, healthy, and fit – quickly & naturally – without any BS


Hi! I love these planks so much! Thank you for all that you do.
Thank you for letting me know. xoxo CC
Again, thank you so much. This video so great for my back and abs.
Yay! I’m glad this video works for you. : ) xoxo CC
These planks are waaaaay too challenging for me. Bc I am fat in the belly. Also due to glaucoma, I am not to do yoga. Are there any other exercises I can do instead of the planks? Btw, I am 68 yo. TY
Yep! Check out my other ab workouts. I have tons. https://www.christinacarlyle.com/workouts-for-women/
Plank exercises can also help strengthen and tone our back, shoulders, thighs, and butt. While performing planks are an excellent way to build our core, there are variations I can do to achieve greater results, like six-pack abs.
Right… that’s why I shared the BEST variations.
Great video please send weekly updates
Thanks. Make sure you’re a VIP so you’ll get my weekly emails. I only send emails with updates and fresh content to my VIPs. You can sign up here:: https://www.christinacarlyle.com/become-a-vip/ xo CC
Thank you so much. You have inspired me in so many ways of keeping my body in shape, feeling good, and staying healthy. I use as many as your videos as possible. I have recommended your videos to my friends as well.
Again, thank you so much.
Thank you so much Donna! It’s always so nice hearing from you. 🙂 Have you checked out my latest metabolic analysis and weight loss training? You can learn more about it here:: https://www.christinacarlyle.com/weight-loss-training/ If you like my workouts I think you’ll love my free metabolic workshop. xo CC
So enthusiastic to start thank you
You’re welcome Zia xo
excellent piece of information. best of luck
Thank you so much xo